|
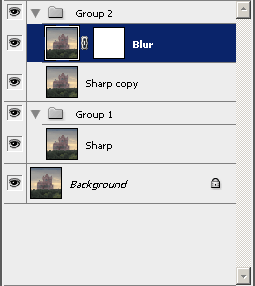
Make Groups
- This action creates the basic layer structure common
to all of my Methods. All of the "Setup" Actions described
below start from this set of layers.
- The actions are:
- Duplicate current layer, name the new layer
"Sharp".
- Duplicate the Sharp layer, name the new layer
"Sharp copy".
- Duplicate the Sharp copy layer, name the new layer
"Blur".
- With the Blur layer selected, click on "Add
Vector Mask" to create a blank mask.
- Select the Sharp Layer, press Ctrl-G to make
Group 1.
- Set the blend mode on Group 1 to "Normal".
- Select the Sharp copy and Blur layers,
press Ctrl-G to make Group 2.
- Set the blend mode on Group 2 to "Multiply".
- Select the image portion (not the mask) of the
Blur layer. Leave this selection at the end of the
action.
|
|
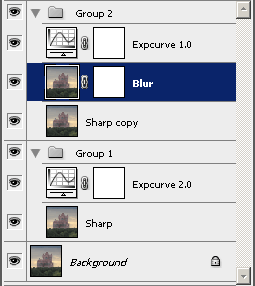
Setup - Expcurves
- This method uses Curves to lighten the images
before they are recombined. The curves are similar to the
effect of a simple exposure adjustment, but with some
of the highlight information preserved.
- The actions are:
- Start with the Make Groups action completed.
- Select the Sharp layer.
- Make a new curves adjustment layer (Menu:
Layer -> New Adjustment Layer -> Curves...)
- Name the new layer "Expcurve 2.0"
- Set the points: (0,0), (51,96), (102,191),
(255,255).
- OK the new curve.
- Select the Blur layer.
- Make a new curves adjustment layer (Menu:
Layer -> New Adjustment Layer -> Curves...)
- Name the new layer "Expcurve 1.0"
- Set the points: (0,0), (70,96), (139,191),
(255,255).
- OK the new curve.
- Select the image portion (not the mask) of the
Blur layer. Leave this selection at the end of the
action.
|
|
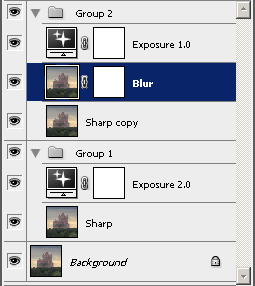
Setup - Exposure
- This method uses Exposure adjustment layers
to lighten the images before they are recombined.
This adjustment is setup to mimic the original
film procedure.
- The actions are:
- Start with the Make Groups action completed.
- Select the Sharp layer.
- Make a new exposure adjustment layer (Menu:
Layer -> New Adjustment Layer -> Exposure...)
- Name the new layer "Exposure 2.0".
- Set the exposure to +2.00.
- OK the new layer.
- Select the Blur layer.
- Make a new exposure adjustment layer (Menu:
Layer -> New Adjustment Layer -> Exposure...)
- Name the new layer "Exposure 1.0".
- Set the exposure to +1.00.
- OK the new layer.
- Select the image portion (not the mask) of the
Blur layer. Leave this selection at the end of the
action.
|
|
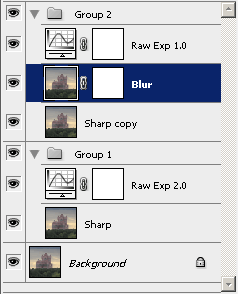
Setup - RawExpose
- This method uses curves to approximate the
lightening effect of a RAW exposure adjustment
with 100% Recovery of the highlights.
This adjustment is setup to mimic the original
film procedure.
- The actions are:
- Start with the Make Groups action completed.
- Select the Sharp layer.
- Make a new exposure adjustment layer (Menu:
Layer -> New Adjustment Layer -> Curves...)
- Name the new layer "Raw Exp 2.0".
- Set the points: (0,0), (11,35), (153,222),
(217,246), (255,255).
- OK the new layer.
- Select the Blur layer.
- Make a new exposure adjustment layer (Menu:
Layer -> New Adjustment Layer -> Curves...)
- Name the new layer "Raw Exp 1.0".
- Set the points: (0,0), (112,164), (192,222),
(221,240), (255,255).
- OK the new layer.
- Select the image portion (not the mask) of the
Blur layer. Leave this selection at the end of the
action.
|

|
Setup - Gamma
- This method uses Gamma to lighten the images
before they are recombined. The Levels adjustment tool
provides the gamma, which cannot be accurately
approximated with Curves. The two gamma values are
selected to give a gamma = 1.0 (no change) result
in the final image.
- The actions are:
- Start with the Make Groups action completed.
- Select the Sharp layer.
- Make a new levels adjustment layer (Menu:
Layer -> New Adjustment Layer -> Levels...)
- Name the new layer "Gamma 3.0".
- Set the middle slider (the gamma value)
to 3.00.
- OK the new layer.
- Select the Blur layer.
- Make a new levels adjustment layer (Menu:
Layer -> New Adjustment Layer -> Levels...)
- Name the new layer "Gamma 1.5".
- Set the middle slider (the gamma value)
to 1.50.
- OK the new layer.
- Select the image portion (not the mask) of the
Blur layer. Leave this selection at the end of the
action.
|

|
Setup - Screen
- This method uses Curves to lighten the images
before they are recombined. The curves are selected to
approximate the effect of screening the original image
with a copy of itself.
- The actions are:
- Start with the Make Groups action completed.
- Select the Sharp layer.
- Make a new curves adjustment layer (Menu:
Layer -> New Adjustment Layer -> Curves...)
- Name the new layer "Screen 1/2"
- Set the points: (0,0), (64,112), (127,191),
(191,239), (255,255).
- OK the new curve.
- Select the Blur layer.
- Make a new curves adjustment layer (Menu:
Layer -> New Adjustment Layer -> Curves...)
- Name the new layer "Screen 1/2"
- Set the points: (0,0), (64,112), (127,191),
(191,239), (255,255).
- OK the new curve.
- Select the image portion (not the mask) of the
Blur layer. Leave this selection at the end of the
action.
|

|
Add Screen 1/2
- This action creates a curve adjustment layer that
approximates the lightening effect of combining a
image with itself using Screen.
- The actions are:
- Make a new curves adjustment layer (Menu:
Layer -> New Adjustment Layer -> Curves...)
- Name the new layer "Screen 1/2"
- Set the points: (0,0), (64,112), (127,191),
(191,239), (255,255).
- OK the new curve.
|

|
Add Screen 1/3
- This lightening curve is meant to be used in a pair
with Screen 2/3 listed below.
- The actions are:
- Make a new curves adjustment layer (Menu:
Layer -> New Adjustment Layer -> Curves...)
- Name the new layer "Screen 1/3"
- Set the points: (0,0), (64,85), (127,173),
(191,234), (255,255).
- OK the new curve.
|

|
Add Screen 2/3
- This lightening curve is meant to be used in a pair
with Screen 1/3 listed above.
- The actions are:
- Make a new curves adjustment layer (Menu:
Layer -> New Adjustment Layer -> Curves...)
- Name the new layer "Screen 2/3"
- Set the points: (0,0), (64,147), (127,210),
(191,244), (255,255).
- OK the new curve.
|
|
Add Expcurve 1.0
- This action creates a curve adjustment layer that
approximates the linear exposure +1.00 correction,
with some curvature to preserve the highlights.
- The actions are:
- Make a new curves adjustment layer (Menu:
Layer -> New Adjustment Layer -> Curves...)
- Name the new layer "Expcurve 1.0"
- Set the points: (0,0), (70,96), (139,191),
(255,255).
- OK the new curve.
|
|
Add Expcurve 2.0
- This action creates a curve adjustment layer that
approximates the linear exposure +2.00 correction,
with some curvature to preserve the highlights.
- The actions are:
- Make a new curves adjustment layer (Menu:
Layer -> New Adjustment Layer -> Curves...)
- Name the new layer "Expcurve 2.0"
- Set the points: (0,0), (51,96), (102,191),
(255,255).
- OK the new curve.
|

|
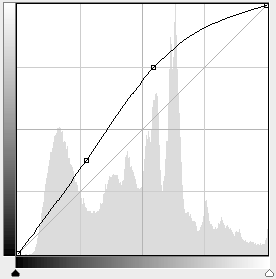
Add Raw Exp 1.0
- This action creates a curve adjustment layer that
approximates the Camera Raw exposure +1.00 correction,
with 100% Recovery of the highlights.
- The actions are:
- Make a new curves adjustment layer (Menu:
Layer -> New Adjustment Layer -> Curves...)
- Name the new layer "Raw Exp 1.0"
- Set the points: (0,0), (112,164), (192,222),
(221,240), (255,255).
- OK the new curve.
|

|
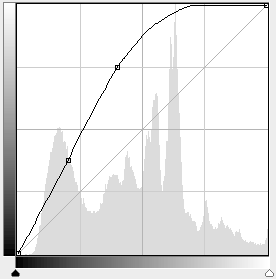
Add Raw Exp 2.0
- This action creates a curve adjustment layer that
approximates the Camera Raw exposure +2.00 correction,
with 100% Recovery of the highlights.
- The actions are:
- Make a new curves adjustment layer (Menu:
Layer -> New Adjustment Layer -> Curves...)
- Name the new layer "Raw Exp 2.0"
- Set the points: (0,0), (11,35), (153,222),
(217,246), (255,255).
- OK the new curve.
|