|
|
1. Download Actions File
- Right-click on this link:
Orton_Effect.atn
- Select 'Save Link As..." from the menu
- Save the file to your computer
- Note: This action set is known to work in
Photoshop CS2 and CS3 for Windows. It does not work
correctly under Photoshop 7 (old versions handled
layer groups differently.)
|
|
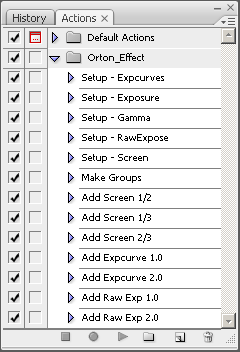
2. Load Actions in Photoshop
- Start Photoshop
- Locate the Actions window (Menu: Windows
-> Action)
- Left-click on the menu pulldown button on the
actions window to bring up the menu. (It looks like
a down-arrow next to 3 lines in the top left
corner.)
- Select "Load Actions..." and then find the
Orton_Effect.atn file that you saved above.
- You should have a new folder of actions
similar to the one seen to the left.
|
|
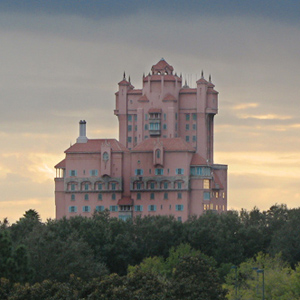
3. Load Your Image
- Load your image into Photoshop
- In this example, I'm using a 300x300 pixel
photo of the Tower of Terror at Disney MGM Studios
|
|
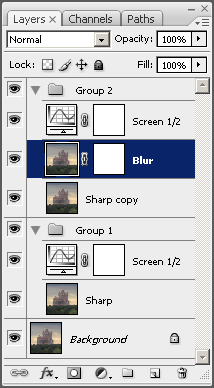
4. Apply one of the "Setup" Actions
- Go to the actions window, and select one of the
"Setup" actions. All of the Setup actions work the
same way, with slightly different lightening steps
included. In this example, I have selected the
"Setup - Screen" action.
- Run the selected action, by clicking on the
little "play" triangle icon at the bottom of the
actions window.
- The action should play out, leaving you with
a new set of layers like this one on the left.
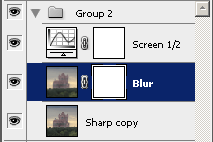
- Group 1 is the sharp group. It contains the
original, sharp image, and a lightening layer.
- Group 2 is the blur group. It contains a
copy of the original image, a second copy to be
blurred and masked, and another lightening layer.
|

|
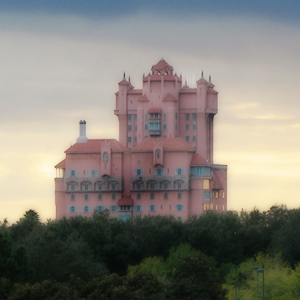
5. Image After Setup is Run
- This shows my example image after the layers
have been created by the Setup action. The image should
look about the same as the original.
- Setup-Screen (seen here) tends to increase the
contrast of the resulting layers.
- Setup-Exposure and Setup-Expcurves will also
increase the contrast, and may clip the image in the
highlights somewhat.
- Setup-Gamma will not change the contrast. You
should not notice any difference between the
composed image and the original with this action.
|
|
6. Blur the Blur Layer
- Click on the image thumbnail in the blur layer to
select it. (The action is set to leave this layer selected
for you automatically.)
- Apply a Gaussian Blur to the layer. (Menu: Filter
-> Blur -> Gaussian Blur...)
- As a rule of thumb, I set the blur radius around
1% of the size of the image. In this example, I used
a radius of 4.0 pixels for a 300 pixel image.
- Click on "OK" to commit the blur filter.
- You should now have a simple, two-layer Orton image,
like the one shown on the left.
|
|
7. Mask the Third Layer
- The Setup action automatically created mask on the
Blur layer, and left a Sharp copy layer underneath it.
- You can use this mask to selectively sharpen parts
of the image, while leaving the rest of it blurred and
soft.
- Click on the white mask box on the Blur layer
to select the mask layer. This will allow you to use
the standard tools to draw on the mask, and not on the
image.
- Set your colors to black and white (press 'D').
- Select the Brush tool (press 'B'). Adjust the
softness and size of your brush as needed.
- Set the opacity of the brush to something like
40-50%. This will allow you to mask out the blur
more gradually.
- Paint on the mask using your brush, in any place
where you want the original sharpness of the image to
show through the effect. Since you are painting on the
mask, you should see the area under your brush get
sharper with each stroke.
- Masking is not the same as erasing. You can always
undo part or all of the mask by painting with white
instead of black.
|

|
8. Completed Three-Layer Image
- In this example, I masked out most of the face of the
building, to preserve the sharpness of the windows.
- The sky and trees were left unmasked, so they have
the most softened appearance.
- You can now move on to more images very easily using
this Actions set. There are only 4 basic steps:
- Load the picture
- Run one of the Setup actions
- Blur the Blur Layer
- Mask the Blur Layer
|